3 years ago
Monday, March 19, 2012
Time to Get Crafty!
I FINALLY got around to re-doing my extra room and making it craft-friendly! I have to give credit directly to http://sewmanyways.blogspot.com/ (Thank you Karen!) I don’t know Karen personally, but found her site via Pinterest. I loved the black and white inspired craft room she created and incorporated a lot of her ideas. (The link to her site is to the right on my blog.) My room is no where near as elaborate, but here we go!
EDIT!!! - I originally wrote that I couldn't find the “Before” pics, but I found them! Prepare yourself, they're scary! It's embarrassing, but I'm posting them in the hopes that SOMEONE can relate.

And now, the finished room! Here’s the overview walk around the room, and then I’ll break it down in detail below. (Click on any picture to enlarge.)


OK, let’s break it down. I removed the big closet doors, emptied the closet, painted inside so it would match the room, and added a shelf (I was pretty proud of myself for adding the shelf all by myself!) I needed to keep the top shelf for storage, but it was ugly up there so I added a curtain rod and an inexpensive curtain to the top to cover my junk (shh, don’t tell anyone!)
Below: I already had the white piece, which was perfect for my Cricut supplies and a few other items. The paisley printed box on the far left is just a box (like a small cereal box) covered with fabric (Karen has instruction for this in her blog), and the same goes for the polka-dot box on the shelf, though that was a leftover box I had from a greeting card assortment. It worked perfectly for my photo squares & stickers. I also already had the Mickey shaped peg which I designated for my Cricut scissors.


The smaller boxes were on sale at Michael’s 6 for $10. and the bigger ones were on sale 40% off plus a coupon, so a great deal, and they're really nice. The "Mickeys" are just shower curtain hangers that I thought I might be able to use later on. And they were just CUTE!
The wire mesh holder was silver colored and I spray painted it black, the polka-dot boxes are just covered in fabric (again, Karen’s blog…you can make them from cereal boxes but these were ones I had but were not b/w), a black/white notebook (on clearance at Target!), and the paisley box (Target $1. aisle!)

The ribbons are on a simple spring rod, full already, but I can always add another. (By the way, yes I know it’s no longer 2006. My Mickey was featured on this Cockapoo calendar when she was a puppy, and I just like looking at it.

The filing cabinet was a really ugly one that I spray painted black and added pretty contact paper to the drawers. Here’s a “before” and “after”. (The “before” pic is not great…I had already started painting when I remembered to take it.)


I bought the peg boards from Home Depot and, as you can see, it holds more than scissors…magnifying glass, spray bottle to clean rubber stamps, a hole punch, and even my reading glasses, also black & white of course!

A few pens & pencils! The polka-dot and paisley container is covered with fabrics (the bottom spins-bonus!), and leftover “Mickey” coffee can. The glue gun is on a silicone pot holder, which apparently works well for any hot drips of glue when you’re using the gun.

More inexpensive photo boxes, plus the little $1. aisle Target boxes. I already had this little shelf thingy too, but it was white and I spray painted it black. The framed pics are Walt Disney and the castle (right) and a a cute little Mickey one my friend Nancy gave me.

I have a collection of “Mickey” stuff, and needed to keep a space for this, so I did buy this shelf unit from Target for $30. I also already had the Mickey candle sconces.

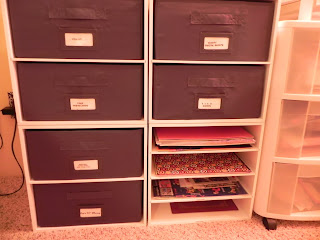
Some “cubes” and drawers that I already had. Still need to organize the drawers & shelves a bit.
Just for fun, polka-dots! Oh how I love them! When I found black & white polka-dotted flowers at Michael’s I think I squealed out loud! The vase was found by a friend at a garage sale. The polka-dotted box is a greeting card assortment, and then of course the Minnie Mouse mug.

A couple more tid-bits: I also covered the light switch and electrical outlets with b/w paisley contact paper. You can see one in the first pic of the room. Another Pinterest idea!
And inside the closet, I mounted an outlet strip to the wall. An outlet strip makes for an easy way to shut off everything with one switch.

The 4th wall still has my Dad’s desk with his “Video Eye”, a machine that magnifies things for low vision. It will have to remain that way for now.
That’s it! Now I need to actually do some crafting! Haha. At least now I don’t have to be embarrassed to show this room anymore!


And now, the finished room! Here’s the overview walk around the room, and then I’ll break it down in detail below. (Click on any picture to enlarge.)


OK, let’s break it down. I removed the big closet doors, emptied the closet, painted inside so it would match the room, and added a shelf (I was pretty proud of myself for adding the shelf all by myself!) I needed to keep the top shelf for storage, but it was ugly up there so I added a curtain rod and an inexpensive curtain to the top to cover my junk (shh, don’t tell anyone!)
Below: I already had the white piece, which was perfect for my Cricut supplies and a few other items. The paisley printed box on the far left is just a box (like a small cereal box) covered with fabric (Karen has instruction for this in her blog), and the same goes for the polka-dot box on the shelf, though that was a leftover box I had from a greeting card assortment. It worked perfectly for my photo squares & stickers. I also already had the Mickey shaped peg which I designated for my Cricut scissors.


The smaller boxes were on sale at Michael’s 6 for $10. and the bigger ones were on sale 40% off plus a coupon, so a great deal, and they're really nice. The "Mickeys" are just shower curtain hangers that I thought I might be able to use later on. And they were just CUTE!
The wire mesh holder was silver colored and I spray painted it black, the polka-dot boxes are just covered in fabric (again, Karen’s blog…you can make them from cereal boxes but these were ones I had but were not b/w), a black/white notebook (on clearance at Target!), and the paisley box (Target $1. aisle!)

The ribbons are on a simple spring rod, full already, but I can always add another. (By the way, yes I know it’s no longer 2006. My Mickey was featured on this Cockapoo calendar when she was a puppy, and I just like looking at it.

The filing cabinet was a really ugly one that I spray painted black and added pretty contact paper to the drawers. Here’s a “before” and “after”. (The “before” pic is not great…I had already started painting when I remembered to take it.)


I bought the peg boards from Home Depot and, as you can see, it holds more than scissors…magnifying glass, spray bottle to clean rubber stamps, a hole punch, and even my reading glasses, also black & white of course!

A few pens & pencils! The polka-dot and paisley container is covered with fabrics (the bottom spins-bonus!), and leftover “Mickey” coffee can. The glue gun is on a silicone pot holder, which apparently works well for any hot drips of glue when you’re using the gun.

More inexpensive photo boxes, plus the little $1. aisle Target boxes. I already had this little shelf thingy too, but it was white and I spray painted it black. The framed pics are Walt Disney and the castle (right) and a a cute little Mickey one my friend Nancy gave me.

I have a collection of “Mickey” stuff, and needed to keep a space for this, so I did buy this shelf unit from Target for $30. I also already had the Mickey candle sconces.

Some “cubes” and drawers that I already had. Still need to organize the drawers & shelves a bit.

Just for fun, polka-dots! Oh how I love them! When I found black & white polka-dotted flowers at Michael’s I think I squealed out loud! The vase was found by a friend at a garage sale. The polka-dotted box is a greeting card assortment, and then of course the Minnie Mouse mug.

A couple more tid-bits: I also covered the light switch and electrical outlets with b/w paisley contact paper. You can see one in the first pic of the room. Another Pinterest idea!
And inside the closet, I mounted an outlet strip to the wall. An outlet strip makes for an easy way to shut off everything with one switch.

The 4th wall still has my Dad’s desk with his “Video Eye”, a machine that magnifies things for low vision. It will have to remain that way for now.
That’s it! Now I need to actually do some crafting! Haha. At least now I don’t have to be embarrassed to show this room anymore!
Subscribe to:
Posts (Atom)
Sew Many Ways blogspot by Karen

My Blog List
-
-
7 years ago
-
8 years ago
-
10 years ago
-